
VÝROBEK
ŘEŠENÍ
podle případu použití
dozvědět se více
ŠablonyBlogVideaYoutubeCENY
ZDROJE
KOMUNITY A SOCIÁLNÍ MÉDIA
PARTNERI
Tento výkonný nástroj využívá umělou inteligenci k pochopení a zodpovězení dotazů zákazníků v reálném čase. Dokáže zpracovat širokou škálu dotazů zákazníků, od odpovědí na často kladené otázky až po poskytování personalizovaných doporučení. Zvyšte spokojenost zákazníků a zefektivněte proces zákaznické podpory pomocí našeho chatbota s umělou inteligencí bez kódu pro vaše webové stránky.


Create your first line support AI assistant by yourself with no code using latenode.com, chatwoot and OpenAI assistant, and read this article to learn how to do it!

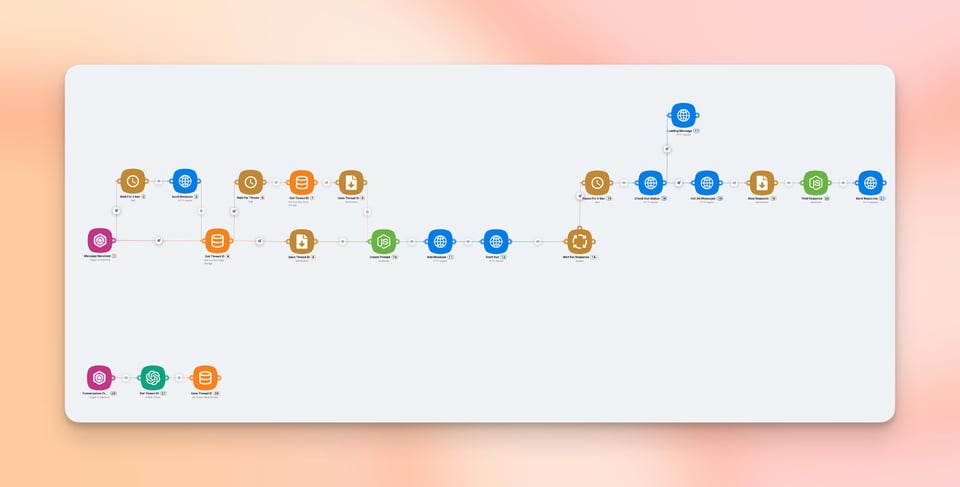
That is the final version of this chatbox AI workflow, let me explain what is going on here.
This scenario gets the user questions from the Support AI chatbox on our website, sends it to the chatGPT assistant armed with product documentation and then sends the response back to the website chatbot. Now let’s have a closer look to break down each step of the process.
There are few things you’ll need to create an AI chatbot.
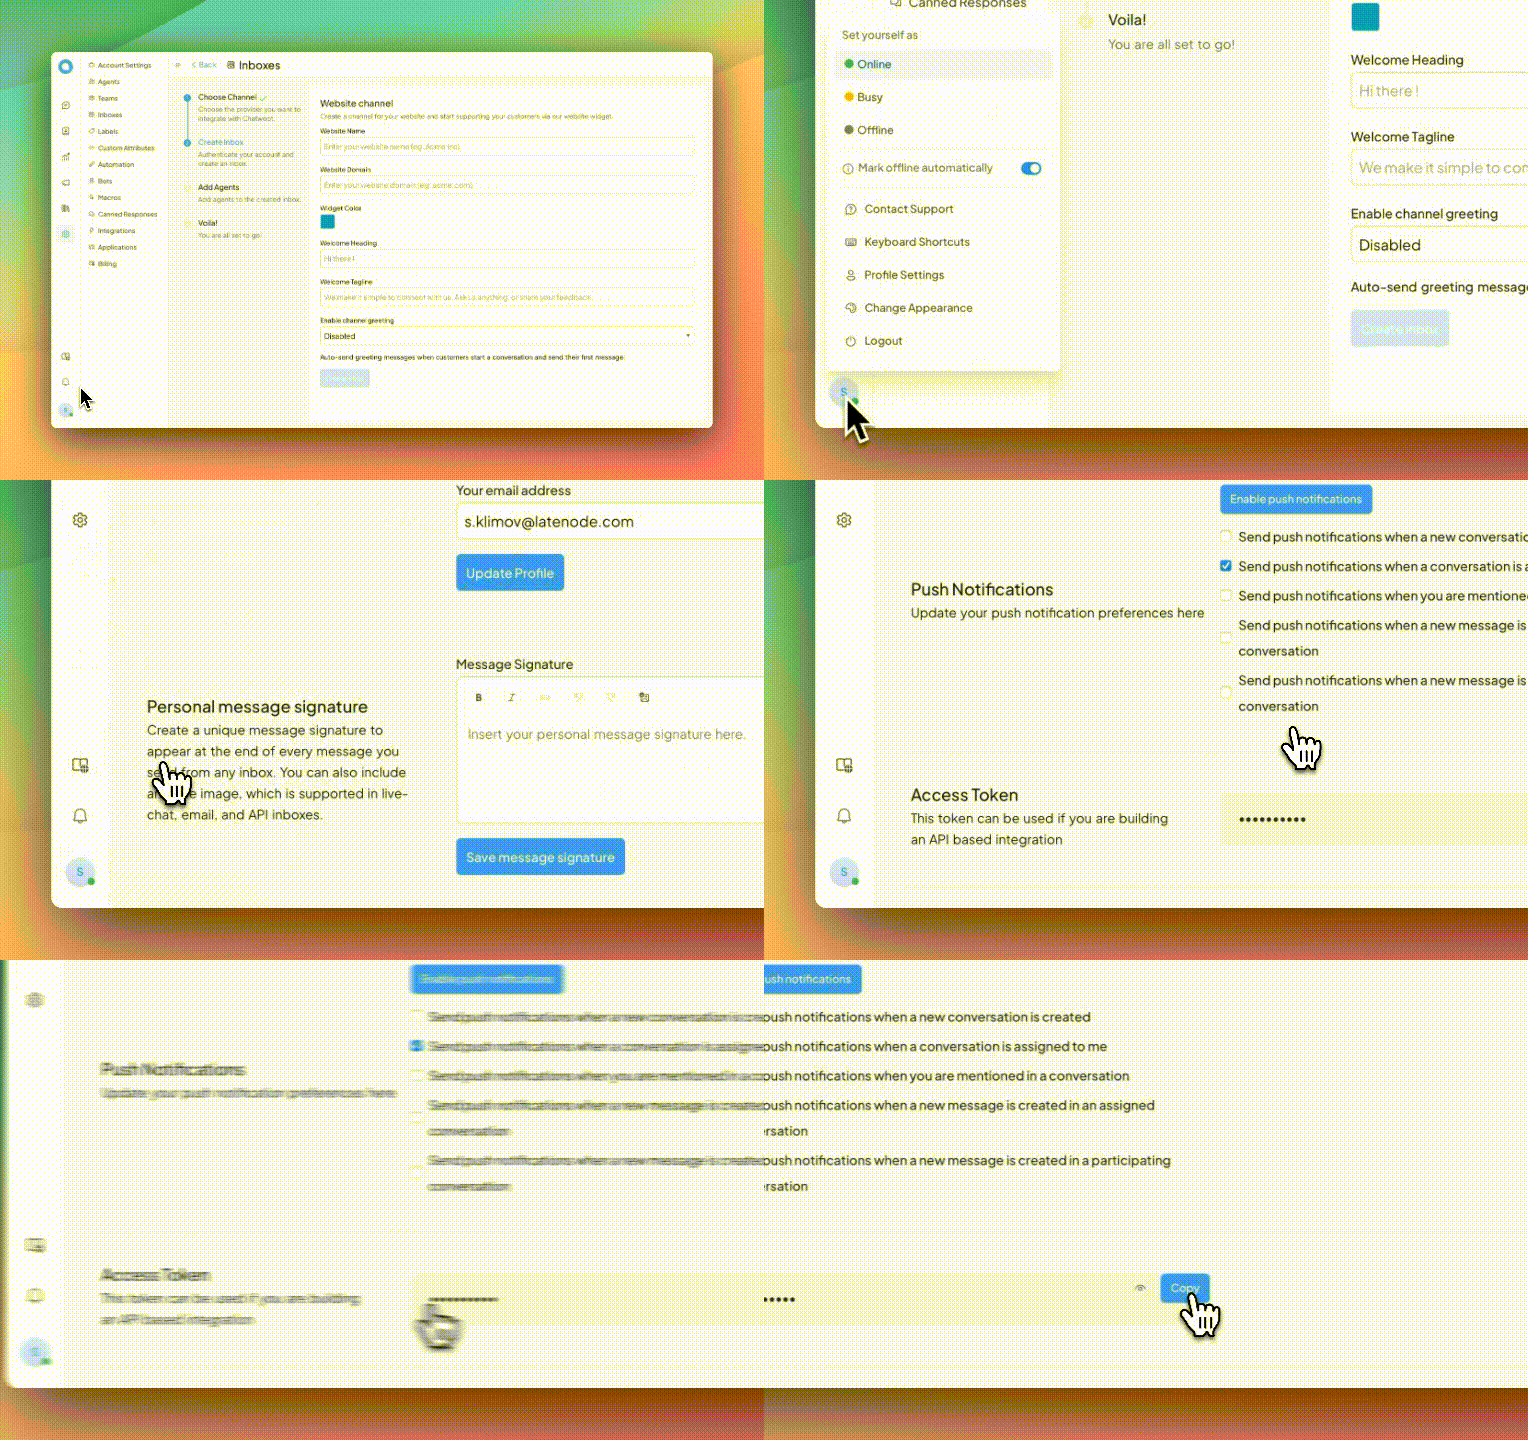
Obviously, to make this chatbot for website work, you’ll have to create a pop up tab on your site where users can ask the questions. In this case, we use Chatwoot to create it, ‘cause it is open source and we can use it for free. So, how to set it up?


Ok, now your Support AI chat bot has a widget on your website, let’s go on!
To je jednoduché. Přihlaste se ke svému účtu OpenAI a přejděte na stránku asistentia klikněte na tlačítko "vytvořit" v pravém horním rohu. Zobrazí se panel nastavení asistenta.

Zde je třeba:
Copy the assistant’s ID (you see it under the Name column), then go to API keys, create one and save it.
Now it’s time to go to latenode.com and start making our website support chat bot scenario!
Now it’s time to set up a Latenode AI chat bot scenario, and now you’ll see what you have to do!
After you’ve created a Latenode account here and logged into it, go to the ‘Shared templates’.

Then go to the AI examples folder. The AI conversation generator template you’re searching for is called ‘GPT Customer Support Bot. Chat Widget + Assistants API’. Click on it, and after that, push the ‘Clone’ button in the lower left corner to copy this website chatbot workflow. It would be automatically added to your list of scenarios.
Your web chatbot scenario needs some variables to function. You can create them in the same name tab. So, the variables you have to create are:
You need to recall your instructions and try to respond with relevant information to that message.
- First, understand the intent behind the user's message.
- If the user's message is too short to understand or not too specific to answer - tell him that and ask questions to clarify his message.
- If the user’s message relates to the Latenode, use the files downloaded to you to find any related information you can use to help him.
- If the user’s message doesn’t relate to the Latenode, also try to answer it. You can skip the docs search part for the sake of speed and just try to give the answer based on your own knowledge.
- Finally, respond concisely and understandably. Respond in the same language the user used to write to you.
Choose string type for every variable except bot_loading_phrases, it should be a JSON.
To make a chatbot scenario work, you need to set up two webhook triggers.
First one is triggered after the conversation starts in the web chat bot widget and creates a thread with chatGPT assistant.

First, customize your ‘Conversation created’ production url and copy it.

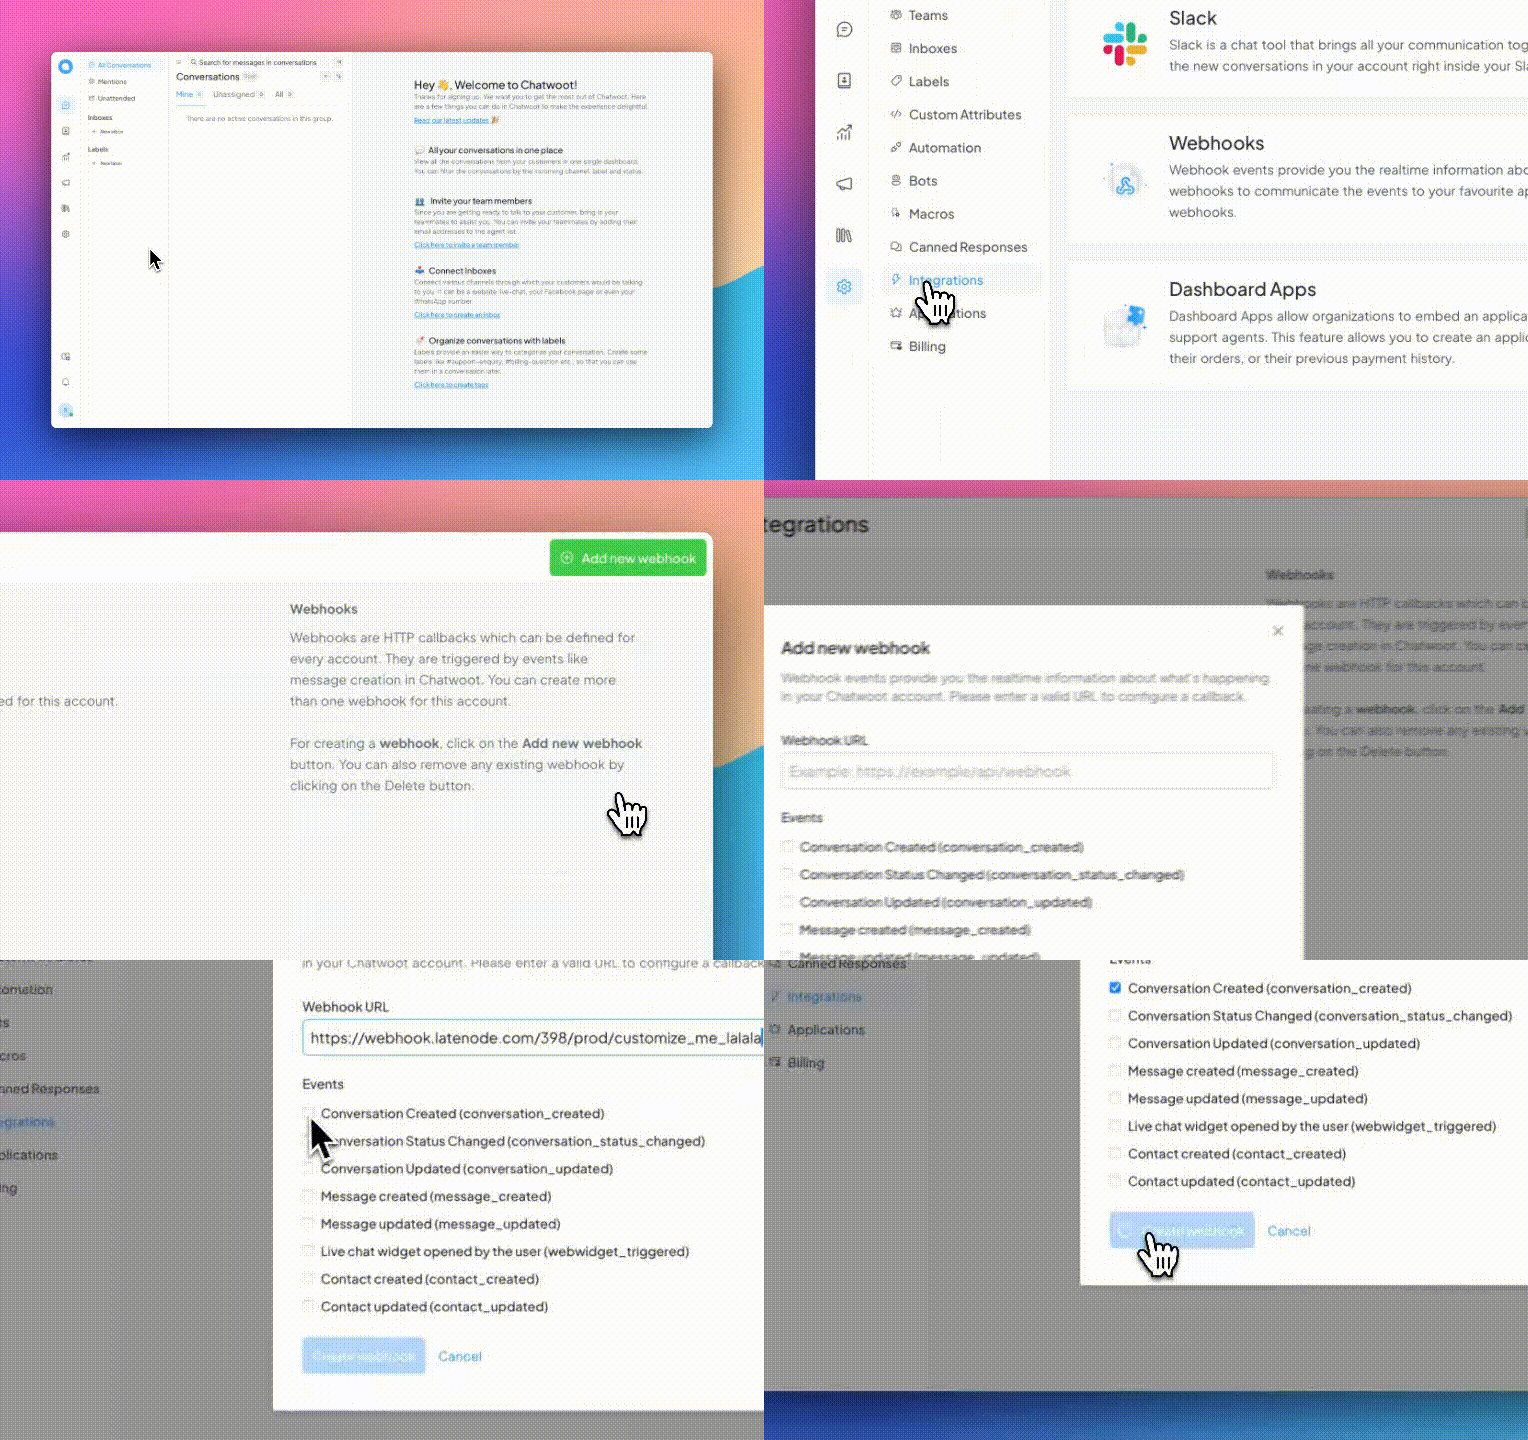
Then go back to Chatwoot. Go to Integrations. Click the ‘Configure’ button on Webhooks, then add a new webhook. Paste the production URL here and choose the ‘Conversation created’ option. That’s it!
The second Webhook trigger is activated when the message is created. Do all the same here. Customize the production URL and copy it, then go to Chatwoot again and do everything the same but choose the ‘message created’ option instead of ‘Conversation created’.
If you successfully passed all the previous steps, congrats! Save the scenario changes, click the ‘deploy’ button to activate the workflow, and that’s it! Now you know how to make an AI chatbot widget for your website!
Hope this article was clear, but if you have any questions on this AI chat bot scenario, you can always ask for help in the Latenode Discord channel.
Brzy se uvidíme a přejeme šťastnou automatizaci!
Ano, stránka Latenode je určena pro uživatele všech úrovní dovedností. Nabízí pokročilé funkce pro ty, kteří jsou zběhlí v JavaScriptu, a intuitivní vizuální nástroje a pomoc umělé inteligence pro začátečníky. Ať už jste zkušený vývojář, nebo začátečník, Latenode poskytuje uživatelsky přívětivé prostředí přizpůsobené vaší úrovni dovedností.
Ano, Latenode podporuje integraci s celou řadou služeb a rozhraní API třetích stran. Můžete propojit Latenode s různými online platformami, databázemi a softwarovými systémy a automatizovat tak přenosy dat, spouštět akce a zefektivnit pracovní postupy. Latenode také poskytuje nástroje a zdroje, které proces integrace usnadňují.
Ano, Latenode nabízí bezplatnou verzi, která vám umožní prozkoumat její možnosti. Tato verze obsahuje podmnožinu funkcí Latenode a umožňuje vám začít s automatizací a vyzkoušet si její výhody. Poté se můžete rozhodnout, zda přejdete na placený plán pro další funkce a zdroje.
Latenode je viditelný a intuitivní automatizační nástroj, který má zákazníkům umožnit zefektivnit jejich pracovní postupy pomocí automatizace. Umožňuje zákazníkům vytvářet počítačové strategie prostřednictvím propojení různých internetových nabídek a gadgetů, což jim umožňuje úspěšně automatizovat povinnosti a zdobit produktivitu.
Díky integraci všech marketingových nástrojů na jednom místě prostřednictvím integrace dat vám Latenode pomůže získat komplexní přehled o vašich operacích. Díky tomu můžete snadněji identifikovat potenciální příležitosti a přijímat informovaná rozhodnutí na základě přesných dat.